Showing posts with label China Glaze. Show all posts

Saturday, October 30, 2010

Halloween nails

I finished my exams yesterday, so I didn't really get time to put together a costume. Not to mention I didn't feel like spending money so all I really did for Halloween, beauty-wise, was do a smokey eye (no pics sorry...was in a huge hurry yesterday) and paint my nails with:

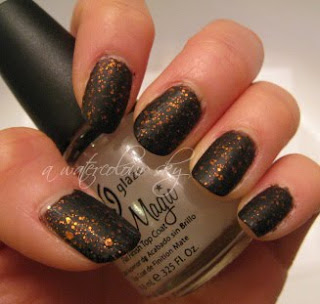
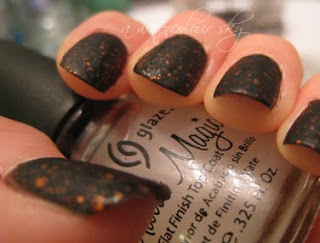
China Glaze Fortune Teller, and Sally Hansen Hidden Treasure

Photobucket

I'm quite surprised by how wide the brush for Hidden Treasure is. That brush is even wider than OPI's brush, so it made applying the flakies extremely easy and quick.

Photobucket

You've all seen Fortune Teller by itself (from my old post):


Here it is with Hidden Treasure on top:

Photobucket

Photobucket

Hidden Treasure adds a gold-greenish tint to the overall look since the flakies have that iridescent effect.

Anyway thanks for sticking with me and reading this post :) This blog's 3rd anniversary will be coming up Nov 3, so it may be worth your while checking back for a giveaway in the next few days!

Sunday, June 20, 2010

Delicate turquoise

I did my nails last weekend. with the intention of making use of my Konad set.

First, used 2-3 coats of China Glaze For Audrey, followed by Seche Vite topcoat.

Photobucket


Then used OPI Golden Rules! with Konad m73 plate.

Photobucket

Photobucket

Photobucket

Photobucket

Photobucket

Not sure why, but the colour combined with the pattern reminded me of antique china...anyone else getting that vibe? Or does it remind you of something else?


What I used:

Photobucket

China Glaze For Audrey
OPI Golden Rules!
Konad m73 plate
Seche Vite top coat


Bonus: Topped with China Glaze Matte Magic topcoat!

Photobucket

Photobucket

Photobucket

Photobucket


So do you prefer the look shiny or matte? I really liked shiny at first, but after putting on Matte Magic and comparing the two pictures I think matte wins out slightly for me :)

Monday, December 21, 2009

China Glaze Cleopatra, Fortune Teller, and Matte Magic

First, Cleopatra is a yellower version of Medallion:


(sorry for the state of my cuticles!)

The glitters aren't *quite* as dense as Medallion so I think it would take 4 coats to create a thick enough coat to cover your nails. I had 3 coats on in the picture and there are some areas where you can see the nail bed still.


Fortune Teller took some getting used to, as I'm not accustomed to wearing black polish. Swatch below is without any topcoat. I think it would look gorgeous if I had used Seche Vite on top to give it a super glossy shine.


I didn't think of using Seche Vite because I wanted to use the Matte Magic top coat on top and test its wearability. Matte Magic goes on glossy but dries down matte. It doesn't protect the polish though, on the contrary I found that the polish was easily dented. The topcoat seemed to wear off easily too with just 1 coat - I would try 2 coats next time to see if it wears better. Or, maybe 1 coat Seche Vite (glossy) on top then 1 coat of Matte Magic on top...hmmm

Anyway, I prefer Fortune Teller matte more than glossy - the matte effect makes the black look more classy than regular shiny black.


Another shot to capture the matte finish:


I picked up Matte Magic at Sally's Beauty Supply for CDN$3.99 member price same as a regular China Glaze polish. However the bottle is much smaller than the regular polishes:


Still, its a nice product to have around to take advantage of the matte trend without buying a new set of matte colours! I doubt I would finish even this small bottle anyway since I don't get to wear polish that often.

Did you try any matte polishes yet? Or matte top coats? Which ones are you enjoying?

Monday, November 9, 2009

All that glitters...

China Glaze Medallion


3 coats of Medallion + 2 coats Seche Vite = impenetrable nailpolish

Photobucket

Gorgeous pale gold glitter. It held up WAY better than Atlantis did, but removal was a major pain. Still love it though, can't wait to pair it with a teal-blue shade such as For Audrey.

Sunday, October 18, 2009

Atlantis

Sorry for neglecting the blog for a bit...I snuck away on vacation for a few days last week :) Did quite a bit of wallet damage due to the favourable exchange rate, so I really should put myself on a shopping ban for the rest of the year.

Here are some questions from my last post:

this colour looks very different from the tube, to your swatches to your lips. did your natural lip colour alter it ?

Since the colour is rather sheer yes the shade you get with just one layer will be different. But if you layer it a few times the colour you get will be more like the lip swatch picture. The picture of it in the tube is brighter than in real life due to my camera acting strange. (My camera seems to warp the colour of lipsticks in tube form and make them redder than they really are)

and its just the lipstick? no lipbalm or gloss?

Yep just lipstick :) I actually forgot to bring my lipbalm on vacation but didn't want to buy another lipbalm since I have about 6 lying around the place. So I just used this product for lipbalm and it worked beautifully. Just had to be more careful about application since this particular colour is quite bright.


At Alienman's request here are pictures of China Glaze Atlantis that I picked up from Sally's Beauty Supply with their get $3 off 2 glitter/chrome polishes:


To get this colour / glitter intensity was 2 coats, would be even better with 3. I also used Seche Vite top coat to cut down on drying time.

Photobucket

I don't know what it is with me and glitter polishes, but with me they don't last - Atlantis chipped on me after 2 days, same with my Canmake glitter polish.

Photobucket

Within a few days almost half the polish was gone on some fingers :/ Now it could just be me abusing my nails since I was travelling, so I'll give it another chance. Or maybe Seche Vite doesn't go well with glitter polish because it doesn't really give them a chance to dry?


Also Alienman requested pics of my new haircut. I got my hair cut about a week ago at Maya Hair Salon again. The stylist this time was pretty good. If anyone in Toronto feels like trying the place ask for Toshi. Cost me only $25 for wash, cut, and blow dry. Gotta love Koreatown for cheap haircuts :)

Photobucket

Similar to before, just styled nicer by him with more layers so it doesn't look as heavy.

Photobucket

To show the layers:

Photobucket

Yeah now I just need to learn how to blow dry my hair like that again. Bf commented my hair doesn't look as nice as when I first came back from the salon >.<
Blog Widget by LinkWithin